Fix DHCP Not Enabled for Local Area Connection in Windows 7
Discover easy solutions to resolve the issue of DHCP not enabled for Local Area Connection in Windows 7, ensuring seamless internet connectivity.
Understanding DHCP and its Role in Network Connections
DHCP (Dynamic Host Configuration Protocol) plays a crucial role in establishing network connections. If you encounter the error “DHCP Not Enabled for Local Area Connection in Windows 7,” follow these steps to fix it.
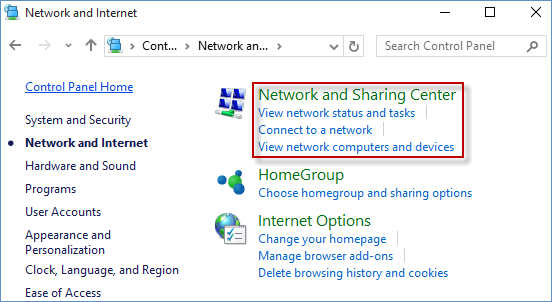
1. Open the Control Panel and navigate to “Network and Sharing Center.”
2. Click on “Change adapter settings” to access the network connections.
3. Right-click on your Local Area Connection and select “Properties.”
4. In the Properties window, scroll down and locate “Internet Protocol Version 4 (TCP/IPv4).”
5. Select it and click on the “Properties” button.
6. Ensure that the “Obtain an IP address automatically” and “Obtain DNS server address automatically” options are selected.
7. Click “OK” to save the changes and close the windows.
8. Restart your computer to apply the new settings.
By configuring DHCP correctly, you can ensure a stable network connection without any further issues.
Resolving DHCP Issues with Ethernet Connections
Fix DHCP Not Enabled for Local Area Connection in Windows 7
DHCP (Dynamic Host Configuration Protocol) is a network protocol used to automatically assign IP addresses and other network configuration settings to devices on a network. However, sometimes DHCP may not be enabled for the local area connection in Windows 7, causing connectivity issues. Here’s how to fix it:
| Issue | Possible Cause | Solution |
|---|---|---|
| DHCP not enabled | Disabled DHCP service | Enable DHCP service |
| No network connection | Faulty Ethernet cable | Check and replace Ethernet cable |
| Incorrect network settings | Manually configured IP address | Set network settings to obtain IP address automatically |
| DHCP service not running | DHCP service stopped | Start DHCP service |
| Firewall blocking DHCP | Firewall settings blocking DHCP traffic | Configure firewall to allow DHCP traffic |
It also repairs DLL files, which are crucial for program functioning. Additionally, it compares the current operating system with a healthy version and restores vital system files, allowing for OS recovery without affecting user data.

Troubleshooting Common DHCP Problems in Windows Operating Systems
If you are experiencing DHCP not enabled for Local Area Connection in Windows 7, follow these steps to troubleshoot the issue:
1. Open the Control PanelNetwork and Sharing Center.
2. Right-click on the Local Area Connection and select Properties.
3. In the Properties window, select Internet Protocol Version 4 (TCP/IPv4) and click on the Properties button.
4. Make sure the Obtain an IP address automatically and Obtain DNS server address automatically options are selected.
5. If they are already selected, try selecting the Use the following DNS server addresses option and enter the DNS server addresses provided by your ISP.
6. Click OK to save the changes and close all windows.
These steps should help resolve the DHCP not enabled issue and restore your internet connection.
powershell

# PowerShell script to check DHCP status for a network interface on Windows 7
$interfaceName = "Local Area Connection"
# Get the network adapter configuration
$adapter = Get-WmiObject -Class Win32_NetworkAdapterConfiguration | Where-Object { $_.Description -eq $interfaceName }
# Check if DHCP is enabled
if ($adapter.DHCPEnabled) {
Write-Output "DHCP is enabled for $interfaceName"
} else {
Write-Output "DHCP is not enabled for $interfaceName"
}
Implementing Solutions for DHCP Configuration Errors
To fix the “DHCP Not Enabled for Local Area Connection” error in Windows 7, follow these steps:
1. Press the Windows key and type “Control PanelNetwork” in the search box.
2. Click on “Control PanelNetwork and InternetNetwork Connections”.
3. Right-click on the “Local Area Connection” and select “Properties”.
4. In the “Local Area Connection Properties” window, select “Internet Protocol Version 4 (TCP/IPv4)” and click “Properties”.
5. In the “Internet Protocol Version 4 (TCP/IPv4) Properties” window, select the “Obtain an IP address automatically” and “Obtain DNS server address automatically” options.
6. Click “OK” to save the changes.
Note: If the “Obtain DNS server address automatically” option is already selected, try selecting the “Use the following DNS server addresses” option and enter the DNS server addresses provided by your ISP.
If the issue persists, you may need to check your router settings or contact your ISP for further assistance.
Maintaining a Stable Network Connection: Tips and Fixes for DHCP
- Open the Control Panel by clicking on the Start button and selecting Control Panel.
- Click on Network and Internet, then select Network and Sharing Center.
- Click on Change adapter settings on the left side of the window.
- Right-click on the Local Area Connection and select Properties.
- Make sure that Internet Protocol Version 4 (TCP/IPv4) is checked and click on Properties.
- Ensure that both Obtain an IP address automatically and Obtain DNS server address automatically are selected.
- Click OK to save the changes.
Method 2: Reset TCP/IP Stack
- Open Command Prompt by pressing Windows Key + R, typing cmd and pressing Enter.
- Type netsh int ip reset and press Enter.
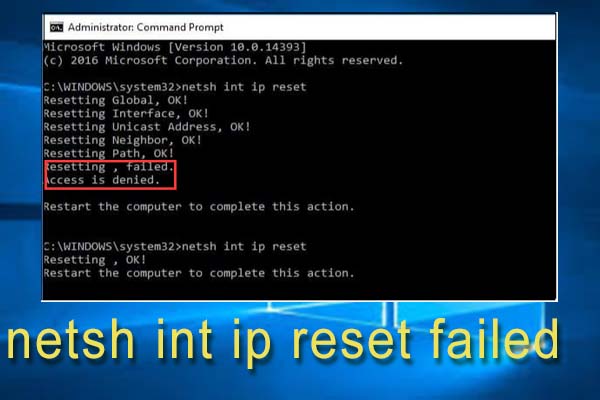
- Wait for the command to complete and then restart your computer.
Method 3: Restart DHCP Client Service
- Open Task Manager by pressing Ctrl+Shift+Esc.
- Click on the Services tab.
- Scroll down and locate DHCP Client.
- Right-click on DHCP Client and select Restart.
- Close Task Manager.
Method 4: Update Network Adapter Driver
- Open Device Manager by pressing Windows Key + X, then selecting Device Manager.
- Expand the Network adapters category.
- Right-click on your network adapter and select Update Driver.
- Select Search automatically for updated driver software.
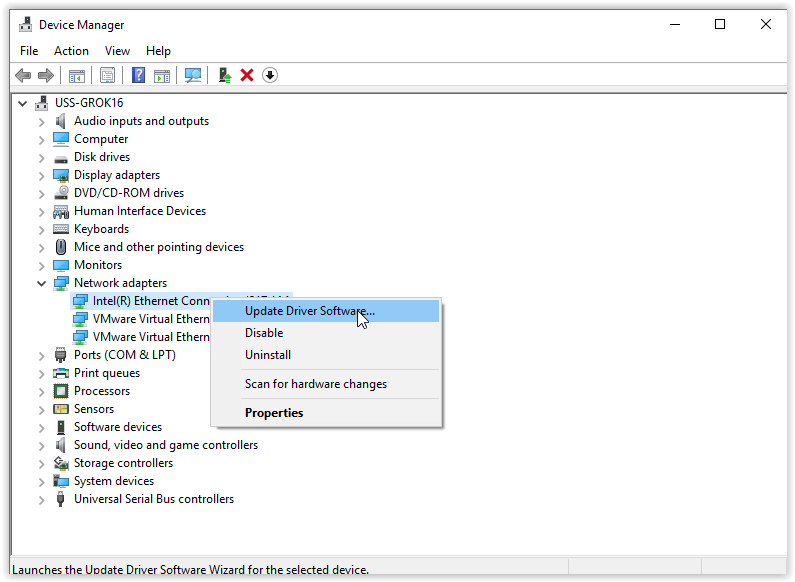
- Wait for the update process to complete.
- Restart your computer.
It is important to ensure that DHCP is enabled for local area connection in Windows 7 to avoid potential connectivity issues. Download this tool to run a scan