Fixing Ethernet Network Unidentified Issue on Windows 10
Troubleshooting network issues can be a tedious task, especially when faced with the “Unidentified Network” problem on Windows 10. In this article, we delve into effective methods to fix this nagging Ethernet issue, allowing you to regain seamless connectivity and get back to a smooth online experience.
Understanding the Unidentified Network Issue in Windows 10
If you are experiencing the “Unidentified Network” issue on your Windows 10 computer, follow these troubleshooting steps to fix the problem:
1. Check the physical connections: Make sure your Ethernet cable is properly connected to both your computer and the router. If possible, try using a different Ethernet cable or port to rule out any hardware issues.
2. Update network drivers: Press the Windows Key + X and select “Device Manager.” Expand the “Network adapters” section, right-click on your network adapter, and select “Update driver.” Follow the on-screen instructions to complete the driver update.
3. Reset network settings: Open the Settings app by pressing the Windows Key + I, then go to “Network & Internet” and select “Network reset.” This will reset all network settings to their default values.
4. Disable airplane mode: Check if airplane mode is enabled by clicking on the network icon in the system tray. If it is enabled, disable it.
5. Check IP configuration: Open the Command Prompt by pressing the Windows Key + X and selecting “Command Prompt.” Type “ipconfig /release” and press Enter. Then type “ipconfig /renew” and press Enter again.
Note: These steps should resolve most Ethernet “Unidentified Network” issues. However, if the problem persists, consider contacting your network administrator or seeking further assistance.
Restarting Modem and Router to Resolve Unidentified Network
If you’re experiencing an Unidentified Network issue on your Windows 10 system, one of the most effective troubleshooting steps is to restart your modem and router. This can help resolve connectivity issues and restore your network connection.
To do this, follow these steps:
1. Turn off your modem and router by unplugging them from the power source.
2. Wait for about 30 seconds to a minute.
3. Plug the modem back in and wait for it to fully restart.
4. Once the modem is fully restarted, plug in your router and wait for it to restart as well.
By restarting both your modem and router, you’re essentially resetting their settings and allowing them to establish a fresh connection with your computer system. This can often resolve any issues causing the Unidentified Network error.
Remember to also check for any available driver updates for your network adapter. This can be done through the Device Manager in the Control Panel.
Once you’ve completed these steps, check if the Unidentified Network error has been resolved. If not, you may need to explore other solutions such as checking your IP address configuration or contacting your internet service provider for further assistance.
Updating Network Card Drivers to Fix Unidentified Network
To fix the Ethernet Unidentified Network issue on Windows 10, you can update your network card drivers. This is an effective solution that can resolve network connectivity problems.
First, press the Windows key + X and select Device Manager. Expand the Network adapters section to find your Ethernet adapter. Right-click on it and select Update driver.
Follow the on-screen instructions to complete the driver update.
Once the update is finished, restart your computer and check if the Unidentified Network issue is resolved. If not, try disabling your antivirus temporarily, as it may interfere with network connections.
If you still encounter the issue, you can try using the Network Reset option. Go to Settings > Network & Internet > Status > Network Reset.
Note: This will remove all network settings and return them to their default state, so make sure to backup any important network configurations or credentials beforehand.
By updating your network card drivers and performing a network reset if necessary, you should be able to fix the Ethernet Unidentified Network problem on your Windows 10 computer.
Temporarily Disabling Security Software for Unidentified Network
To temporarily disable security software for an unidentified network on Windows 10, follow these steps:
1. Click on the network icon in the system tray to open the network settings.
2. Select the network icon that represents the unidentified network.
3. Click on the network icon again and select “Network & Internet settings.”
4. In the Network & Internet settings, navigate to the “Status” tab.
5. Under the “Change your network settings” section, click on “Change connection properties.”
6. Scroll down to the “Network profile” section and click on the dropdown menu.
7. Select “Public” as the network profile.
8. Temporarily disable your antivirus or security software by following the instructions provided by the software manufacturer.
9. Once the security software is disabled, try reconnecting to the unidentified network to see if the issue is resolved.
Please note that disabling your security software temporarily exposes your computer to potential risks. Therefore, it is recommended to re-enable your security software as soon as your connection issue is resolved.
Additionally, Fortect can address issues related to virus damage, freezing programs, damaged DLL files, and even the notorious Blue Screen of Death. It can also help with OS recovery by restoring vital system files without affecting user data.

Disabling Fast Startup Feature to Resolve Unidentified Network
If you are experiencing an “Unidentified Network” issue with your Ethernet network on Windows 10, one potential solution is to disable the Fast Startup feature. This feature can sometimes interfere with the network connection, causing the issue.
To disable Fast Startup, follow these steps:
1. Press the Windows key + X and select “Power Options.”
2. Click on “Choose what the power buttons do” on the left side of the window.
3. Click on “Change settings that are currently unavailable.”
4. Scroll down to the “Shutdown settings” section and uncheck the box next to “Turn on fast startup (recommended).”
5. Click “Save changes” to apply the settings.
After disabling Fast Startup, restart your computer and check if the “Unidentified Network” issue is resolved. If not, there may be other factors causing the problem, such as IP configuration or driver updates. Consider checking those as well.
Changing DNS Servers to Fix Unidentified Network
- Open the Network and Sharing Center by right-clicking on the network icon in the system tray and selecting “Open Network and Sharing Center”.
- Click on Change adapter settings on the left side of the window.
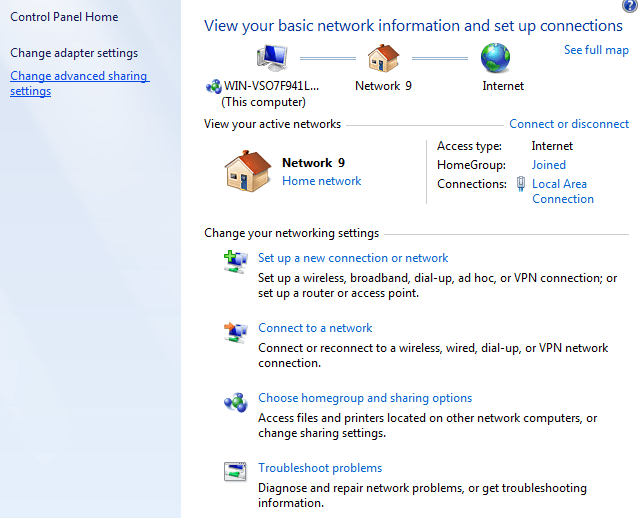
- Right-click on your active network connection and select “Properties”.
- In the Networking tab, scroll down and find Internet Protocol Version 4 (TCP/IPv4). Select it and click on Properties.
- In the General tab, select Use the following DNS server addresses.
- Enter the preferred DNS server address in the Preferred DNS server field.
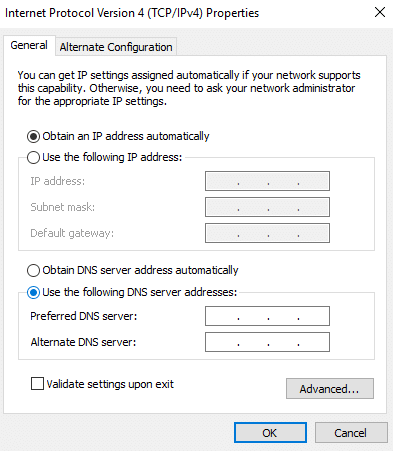
- Enter the alternate DNS server address in the Alternate DNS server field.
- Click OK to save the changes.
- Restart your computer to apply the new DNS server settings.
Running Network Commands for Troubleshooting Unidentified Network
- Open Command Prompt as an administrator by right-clicking on the Start button and selecting Command Prompt (Admin).
- Type the following command and press Enter: ipconfig /release
- Wait for the command to complete, then type the following command and press Enter: ipconfig /renew
- Once again, wait for the command to complete, then type the following command and press Enter: ipconfig /flushdns
- After the command finishes executing, type the following command and press Enter: netsh winsock reset
- Restart your computer to apply the changes.
Diagnosing the Network to Identify and Fix Unidentified Network
To diagnose and fix the “Unidentified Network” issue on your Windows 10 computer, follow these steps:
1. Check your physical connections: Ensure that your Ethernet cable is securely connected to both your computer’s Ethernet port and your router or modem.
2. Restart your devices: Shut down your computer, router, and modem. Wait for a few minutes, then turn them back on in the following order: modem, router, and computer.
3. Reset your network adapter: Press the Windows key + X, then select “Device Manager.” Expand the “Network Adapters” section, right-click on your Ethernet adapter, and select “Uninstall device.” Confirm the action and restart your computer.
4. Renew your IP address: Press the Windows key + X, then select “Command Prompt (Admin).” Type “ipconfig /release” and press Enter. Then, type “ipconfig /renew” and press Enter again.
5. Update your network adapter driver: Visit your computer manufacturer’s website or the network adapter manufacturer’s website to download and install the latest driver for your Ethernet adapter.
6. Disable IPv6: Press the Windows key + X, then select “Network Connections.” Right-click on your Ethernet connection and select “Properties.” Uncheck the box next to “Internet Protocol Version 6 (TCP/IPv6)” and click “OK.”
7. Run the Network Troubleshooter: Press the Windows key + I to open the Settings app. Go to “Network & Internet” and select “Status.” Scroll down and click on “Network Troubleshooter.” Follow the on-screen instructions to diagnose and fix any network issues.
8. Check for software conflicts: Some applications can interfere with your network connection. Uninstall recently installed programs or use the “Apps & Features” section in the Settings app to remove any unnecessary software.
Changing Ethernet Cable to Resolve Unidentified Network
To resolve the Ethernet Network Unidentified issue on Windows 10, follow these steps:
1. First, make sure your Ethernet cable is properly connected to both your computer system and the modem/router. Check for any loose connections.
2. If the issue persists, try using a different Ethernet cable to rule out any cable-related problems. Replace the cable if necessary.
3. Restart your computer and modem/router. Sometimes, a simple restart can resolve connectivity issues. Turn off your computer and unplug the modem/router from the power source. Wait for a few seconds and then plug them back in.
4. Check your IP address configuration. Open the Network and Internet section in Windows 10 settings. Click on “Change adapter options”. Right-click on your Ethernet connection and select “Properties”. Make sure that “Obtain an IP address automatically” and “Obtain DNS server address automatically” options are selected.
5. If the issue persists, try disabling any conflicting applications or security software temporarily. Open the Apps & Features section in Windows 10 settings. Uninstall any recently installed applications that might be causing the issue.
6. Consider updating your network drivers. Right-click on the Start button and select “Device Manager”. Expand the “Network adapters” section and right-click on your Ethernet adapter. Select “Update driver” and follow the on-screen instructions.
Setting a Static IP Address to Fix Unidentified Network
To fix the “Ethernet Unidentified Network” issue on Windows 10, you can try setting a static IP address.
First, go to the Start menu and type “Network Connections” in the search bar. Open the “View network connections” option.
Next, right-click on your Ethernet connection and select “Properties”. In the dialog box that appears, scroll down and double-click on “Internet Protocol Version 4 (TCP/IPv4)”.
In the next dialog box, select the option “Use the following IP address” and enter the required IP address, subnet mask, default gateway, and DNS server addresses.
Note: Make sure to use the correct IP address information for your network. You can contact your network administrator or refer to your router’s settings for this information.
Once you have entered the necessary information, click “OK” to save the changes.
Restart your computer and check if the “Ethernet Unidentified Network” issue is resolved.
This method can help establish a stable and reliable network connection, allowing you to access the internet and other network resources without any problems.
It is important to exercise caution when connecting to unidentified Ethernet networks on Windows 10 to ensure the safety of your device and personal information. Download this tool to run a scan