Windows Display Resolution Change Issues Fixed
This article discusses the resolution change issues encountered by Windows users and presents the solutions to fix them.
Troubleshooting “Windows could not change your display to this resolution”
The first thing you should try is to update your graphics driver by going to Device Manager and selecting “Update Driver” for your graphics card. If that doesn’t work, you can try adjusting the display resolution in Safe Mode.
Another option is to check if your monitor’s drivers are up to date. You can do this by going to the manufacturer’s website and downloading the latest drivers.
If these solutions don’t work, you can try resetting the display settings to their default values. This can be done by going to the Control Panel and selecting “Appearance and Personalization,” then “Display,” and then “Screen Resolution.” From there, click “Advanced Settings” and select “Monitor.”
Updating graphic drivers to fix resolution issues
One of the common reasons for display resolution issues in Windows is outdated or faulty graphic drivers. When the drivers are outdated, the display may not be able to render the resolution correctly, resulting in blurry or distorted images.
To fix this issue, you need to update the graphic drivers to the latest version. You can do this by visiting the manufacturer’s website and downloading the latest driver for your device. Alternatively, you can use the Device Manager to update the drivers.
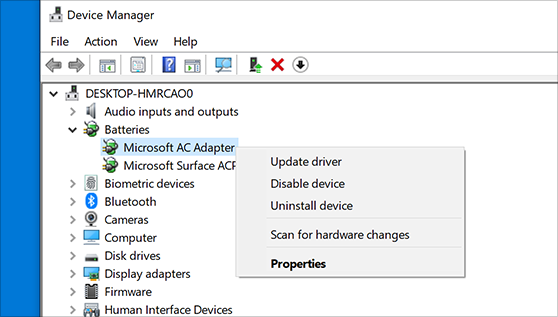
Here are the steps to update graphic drivers using the Device Manager:
1. Press Windows key + X and select Device Manager.
2. Expand the Display Adapters category.
3. Right-click on the graphics card and select Update Driver.
4. Select Search automatically for updated driver software.
5. Follow the instructions to complete the driver update.
Once the driver update is complete, restart your computer and check if the display resolution issue is resolved. If not, you may need to troubleshoot further or seek assistance from a professional.
Uninstalling and reinstalling display drivers as a solution
One common solution for display resolution issues on Windows is to uninstall and reinstall the display drivers. This can be done through the Device Manager in the Control Panel.
First, right-click on the Start button and select Device Manager. Then, expand the Display adapters category and right-click on the display driver you want to uninstall. Select Uninstall and follow the prompts to complete the process.
After uninstalling the driver, restart your computer and Windows will automatically reinstall the driver. If it doesn’t, you can manually download and install the latest driver from the manufacturer’s website.
This process can resolve issues such as blurry text, incorrect resolution, and display not filling the screen. However, if the problem persists, there may be other underlying issues that need to be addressed. It’s always a good idea to check for Windows updates and run a virus scan before attempting any major changes to your system.
import win32api, win32con
def set_resolution(width, height):
"""Sets the display resolution to the specified width and height"""
try:
# Get the primary display device context
hDC = win32api.EnumDisplayDevices(None, 0, None, 0)[0]['DeviceName']
hDC = win32api.CreateDC(hDC)
# Set the display resolution
win32api.ChangeDisplaySettingsEx(hDC, None, width, height, None)
# Display success message
print(f"Display resolution changed to {width}x{height}")
except Exception as e:
print(f"Error: {e}")
# Example usage
set_resolution(1920, 1080)
This code uses the `win32api` module to interact with the Windows API and change the display resolution to the specified width and height. It first gets the primary display device context and then uses the `ChangeDisplaySettingsEx` function to set the resolution. It also includes error handling to catch any exceptions that may occur.
You can modify this code and integrate it into your own tool to provide a user-friendly interface for changing the display resolution.
Utilizing graphics card control panel to change resolution
If you’re experiencing display resolution issues on your Windows computer, you might want to try using your graphics card’s control panel to fix it. This is especially useful if you’re using a high-end graphics card, as it usually comes with advanced settings and options that can help you fine-tune your display resolution.
To access your graphics card control panel, simply right-click on your desktop and select the “Graphics Properties” or “NVIDIA Control Panel” option. From there, navigate to the “Display” or “Screen Resolution” section and adjust the settings according to your preferences. You can also choose to enable or disable features such as anti-aliasing, vertical sync, and texture filtering.
Once you’ve made the necessary changes, click “Apply” or “Save” to save the settings. If the changes don’t take effect immediately, try restarting your computer or resetting your display settings to default. With these simple steps, you should be able to fix any display resolution issues on your Windows computer in no time.
While it does not specifically claim to fix display resolution problems, it addresses the underlying causes of computer freezing, such as damaged registry, missing files, or excessive junk. This ensures smoother performance for Windows and other programs.

Rolling back graphics card driver
Rolling Back Graphics Card Driver
If you’ve recently updated your graphics card driver and are experiencing display resolution issues on your Windows device, you may need to roll back the driver. This simple fix can help you restore your display resolution to its previous state.
To roll back your driver, navigate to the Device Manager on your Windows device. Locate the Graphics Card section and right-click on the graphics card driver you wish to roll back. Select Properties and then click on the Driver tab. From there, click on Roll Back Driver and follow the prompts.
It’s important to note that rolling back your graphics card driver may cause other issues with your device. If you continue to have display resolution issues, consider updating your driver again or seeking assistance from a professional.
Updating computer display driver
Updating your computer’s display driver can help fix a variety of display issues, including Windows display resolution change issues. A display driver is essentially a software program that allows your computer to communicate with your display device, such as a monitor or projector. When your computer’s display driver is outdated or not functioning properly, you may experience issues such as blurry or distorted images, screen flickering, or incorrect display resolutions.
To update your display driver, you can:
– Visit the website of the manufacturer of your computer or graphics card
– Search for the latest display driver for your specific device
– Download and install the driver
It’s important to note that:
– You should always create a system restore point before updating your display driver
– If you’re not comfortable updating your display driver manually, you can use a driver update tool
– Updating your display driver may also improve your computer’s overall performance and stability
By updating your display driver, you can ensure that your computer’s display is functioning properly and avoid issues with Windows display resolution changes.
Using compatibility mode to install graphics driver
Using Compatibility Mode to Install Graphics Driver
If you’re having issues with your Windows display resolution, it’s likely that you need to update your graphics driver. However, sometimes the latest driver might not be compatible with your system. In such cases, you can try installing the driver in compatibility mode.
First, download the driver from the manufacturer’s website and save it to your computer. Right-click on the file and select “Properties.” Go to the “Compatibility” tab and select “Run this program in compatibility mode for” and choose the operating system that the driver was designed for.
Click “Apply” and then “OK.” Double-click the driver file to run it and follow the installation instructions. Once the installation is complete, restart your computer and check if the display resolution issue is resolved.
Using compatibility mode to install graphics drivers can be a quick fix for display resolution issues caused by driver incompatibility.
Enabling GPU scaling to fix resolution issues
One of the most frustrating things that can happen when using a computer is encountering display resolution issues. When your display resolution changes unexpectedly, it can be difficult to work with or even make your computer unusable.
Fortunately, there is a solution: enabling GPU scaling. This feature allows the graphics processing unit (GPU) in your computer to scale the display resolution to fit your screen, without any distortion or blurriness.
To enable GPU scaling, you’ll need to access your graphics card’s settings. This can usually be done by right-clicking on your desktop and selecting “Display Settings” or “Graphics Properties.” From there, look for an option to enable GPU scaling and toggle it on.
Once enabled, you should be able to adjust your display resolution without any issues. Don’t let resolution problems slow you down – enable GPU scaling and get back to work!
Understanding when and why this error occurs
When working on a computer, you may have come across display resolution change issues. This is a common problem, and it can happen for several reasons.
One of the reasons is that the display driver installed on your computer is outdated or corrupted. Another reason could be that the display settings are not configured correctly.
In some cases, this error can also occur due to a virus or malware infection on your computer. This is why it’s essential to keep your computer updated and protected with antivirus software.
To fix the display resolution change issue, you can try updating your display driver or adjusting the display settings. If the issue persists, you may need to run a virus scan on your computer.
Understanding why this error occurs and taking appropriate steps to fix it can help you avoid frustration and ensure that your computer runs smoothly.
Tips for resolving “Windows could not change your display to this resolution” error
- Ensure that the monitor is connected properly to the computer.
- Check that the cables are properly inserted and secured on both ends.
- Try using a different cable to see if the problem is with the cable itself.
Repair Method 2: Update graphics drivers
- Open Device Manager by pressing Windows key + X and selecting Device Manager from the list.
- Expand the Display adapters category.
- Right-click on the graphics card driver and select Update driver.
- Choose the option to search automatically for updated driver software.
- Restart the computer after the driver has been updated.
Repair Method 3: Adjust screen resolution and scaling settings
- Right-click on the desktop and select Display settings.
- Under the Resolution section, select a different resolution from the drop-down menu.

- Try different resolutions until the error is resolved.
- Under the Scale and layout section, adjust the scaling to a different percentage.
- Restart the computer after making changes.
Repair Method 4: Boot in Safe Mode
- Restart the computer and repeatedly press the F8 key until the Advanced Boot Options menu appears.
- Select Safe Mode and press Enter.
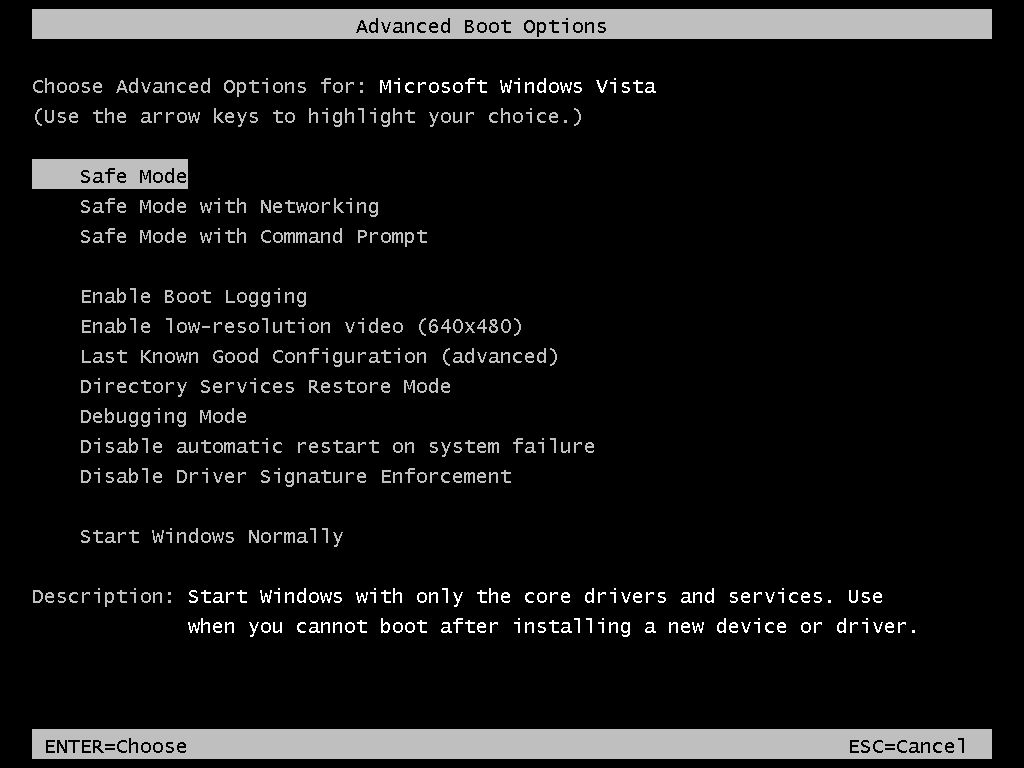
- Once in Safe Mode, follow the steps in Repair Method 2 and Repair Method 3.
- Restart the computer after making changes and boot normally.
It is important to exercise caution when encountering the message “Windows could not change your display to this resolution,” but it is essential not to over exaggerate the severity of the situation. Download this tool to run a scan