Fixing Photoshop Scratch Disk Full Error
Welcome to the solution-oriented guide on resolving the bothersome Photoshop Scratch Disk Full Error. Whether you’re a seasoned designer or an aspiring artist, this article will equip you with practical tips and tricks to effortlessly overcome this common hurdle. Say goodbye to frustrating interruptions and let’s dive into the world of troubleshooting!
Free up disk space and optimize Photoshop’s space usage
To free up disk space and optimize Photoshop’s space usage, follow these steps:
1. Clear the scratch disk: Open Photoshop and go to Preferences > Scratch Disks. Make sure only the necessary disks are selected to be used as scratch disks. If the selected disks are full, clear some space by deleting unnecessary files or moving them to an external storage device.
2. Check disk space: On Windows 10, open File Explorer and go to This PC. Check the available space on your scratch disk(s) and ensure there is enough free space for Photoshop to use. If not, consider freeing up space by deleting unnecessary files or using the Disk Cleanup tool.
3. Optimize disk usage: If you have multiple disks, consider partitioning your hard drive or using a solid-state drive (SSD) for better performance. Partitioning can help allocate resources efficiently, while an SSD can provide faster read and write speeds.
4. Manage virtual memory: Adjusting the virtual memory settings can help optimize Photoshop’s space usage. On Windows, go to Control Panel > System and Security > System > Advanced system settings. Under the Performance section, click on Settings, go to the Advanced tab, and click on Change under Virtual Memory. Ensure that the option “Automatically manage paging file size for all drives” is selected.
5. Consider file system compatibility: If you are using a Mac with an external storage device, make sure it is formatted with a compatible file system such as ExFAT or Apple File System (APFS). This ensures better performance and compatibility with both macOS and Windows.
Specify appropriate scratch disk drives
- Open Photoshop.
- Click on the “Edit” menu at the top of the Photoshop window.
- Select “Preferences” from the drop-down menu.
- Click on “Scratch Disks” in the Preferences window.
- Choose appropriate scratch disk drives.
- Check the available drives listed under “Scratch Disks” section.
- Identify the drives with sufficient free space.
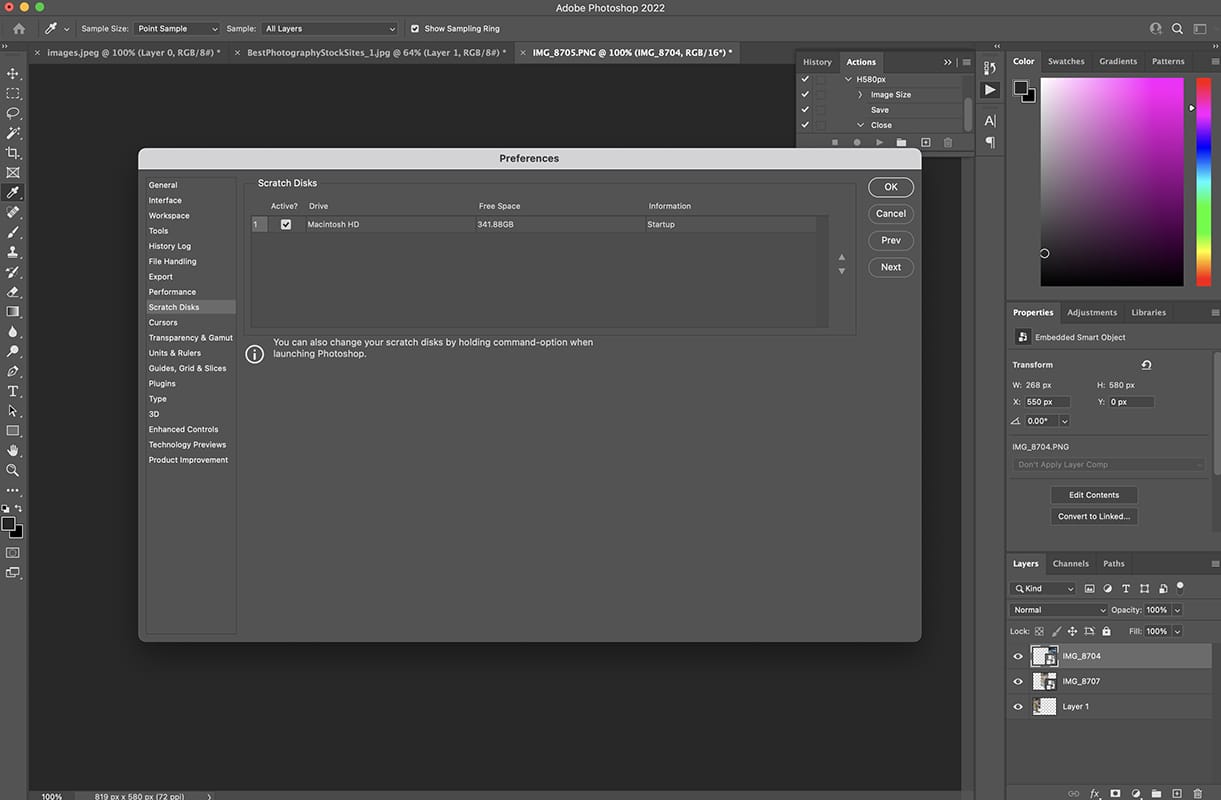
- Ensure these drives are selected by checking the checkboxes next to their names.
- Change the order of scratch disk drives if necessary.
- Click and drag the selected drives in the “Scratch Disks” section to reorder them.
- Place the drives with the most free space at the top of the list.
- Remove unnecessary scratch disk drives.
- If there are any drives listed under “Scratch Disks” that are no longer available or do not have sufficient free space, uncheck the checkboxes next to their names.
- Click “OK” to save the changes.
Fortect also addresses freezing programs by fixing registry issues, missing files, and excessive junk, ensuring smooth performance. It can automatically fix missing or corrupt DLL files and repair the causes of Blue Screen of Death errors, such as incompatible DLLs, drivers, and Windows bugs. Moreover, Fortect offers OS recovery by comparing the current operating system with a healthy version and restoring vital system files necessary for running and restarting Windows without affecting user data.

Troubleshoot and fix the “scratch disks are full” error
If you encounter the “scratch disks are full” error in Adobe Photoshop, don’t worry – we’ve got you covered! Follow these troubleshooting steps to fix the issue quickly and get back to your editing:
1. Close Photoshop: Save any unsaved work and exit Adobe Photoshop.
2. Clear scratch disk space: Open Photoshop again and press Ctrl + Alt (Windows) or Cmd + Option (Mac) while launching the application. This will prompt a dialog box where you can select a different scratch disk or clear the existing one.
3. Check available disk space: Make sure you have enough free space on your hard drive or solid-state drive. Use your computer’s file explorer or disk utility to check the available storage.
4. Delete temporary files: Use the built-in Disk Cleanup utility on Windows or manually delete unnecessary files on Mac to free up some space.
5. Resize the scratch disk: If you have multiple partitions or drives, consider resizing your scratch disk to allocate more space. This can be done through your computer’s disk partitioning tools.
6. Optimize memory usage: Adjust Photoshop’s memory allocation settings by going to Preferences > Performance. Increase the value for “Let Photoshop Use” under “Memory Usage” to allocate more RAM for efficient operation.
Remember to restart Photoshop after making any changes. If the issue persists, consider reinstalling Photoshop or contacting Adobe support for further assistance.
Keep in mind that these instructions are specific to Photoshop CC on Windows 10. If you’re using a different operating system or Photoshop version, the steps may vary slightly.
python

import os
def check_scratch_disk_usage():
scratch_disk = "/path/to/scratch/disk"
total_space, used_space, free_space = shutil.disk_usage(scratch_disk)
if free_space == 0:
print("Scratch disk is full. Please free up some space.")
else:
print("Scratch disk has available space.")
check_scratch_disk_usage()
In this example, the code utilizes the `shutil.disk_usage` function from the `shutil` module in Python’s standard library to check the disk usage of the specified scratch disk. The `check_scratch_disk_usage` function compares the amount of free space on the disk and displays an appropriate message.
Manage memory space on your computer
Manage Memory Space on Your Computer
If you’re encountering the “Photoshop Scratch Disk Full” error, don’t worry – we’re here to help you fix it. This error typically occurs when your computer’s memory space is running low, and Photoshop is unable to access the necessary scratch disk to perform its functions. Follow these steps to resolve the issue:
1. Clear Scratch Disk: Delete unnecessary files or move them to another storage device to free up space on your scratch disk. Photoshop uses the scratch disk as temporary storage when your computer’s RAM is full. To clear the scratch disk in Photoshop CC, go to Preferences > Scratch Disks and uncheck the boxes next to the disks you want to remove as scratch disks.
2. Increase RAM Allocation: If you have sufficient space on your computer’s hard disk, consider increasing the amount of RAM allocated to Photoshop. This can significantly improve performance and prevent the scratch disk error. To do this, go to Preferences > Performance and adjust the “Memory Usage” slider to allocate more RAM to Photoshop.
3. Optimize Disk Partitioning: If you have multiple hard drives or partitions, consider partitioning your disk specifically for Photoshop. This can help optimize the scratch disk performance and prevent errors. Use disk utility tools provided by your operating system (such as Disk Management in Windows or Disk Utility in macOS) to create a separate partition for Photoshop.
By managing your computer’s memory space effectively and optimizing Photoshop’s scratch disk usage, you can prevent the “Photoshop Scratch Disk Full” error and ensure smooth editing without interruptions.
Delete temporary and cache files in Photoshop
To delete temporary and cache files in Photoshop, follow these steps:
1. Close Photoshop if it is currently running.
2. Press the Option key (Mac) or Alt key (Windows) and then click on the Photoshop icon to launch it.
3. A dialog box will appear asking if you want to delete the Photoshop settings file. Click Yes.
4. Photoshop will now open with default settings and all temporary and cache files cleared.
5. Go to the “Edit” menu and select “Purge” followed by “All” to remove any remaining temporary files.
6. If you still encounter the “Scratch Disk Full” error, you may need to change the scratch disk location in Photoshop preferences. Go to the “Edit” menu, select “Preferences,” and then choose “Scratch Disks.”
7. In the Scratch Disk preferences, select a different hard disk drive or partition with sufficient free space, and click OK.
8. Finally, restart Photoshop for the changes to take effect.
By deleting temporary and cache files, you can resolve the “Scratch Disk Full” error in Photoshop and improve its performance.
Reset Photoshop preferences and optimize performance
Resetting Photoshop preferences can help resolve the “Scratch Disk Full” error and optimize performance. To do this, follow these steps:
1. Close Photoshop if it is currently running.
2. Press and hold the **Ctrl + Alt + Shift** keys simultaneously while launching Photoshop.
3. A dialog box will appear asking if you want to delete the Adobe Photoshop settings file. Click **Yes** to proceed.
4. Photoshop will now launch with the default preferences restored.
By resetting preferences, you allow Photoshop to start fresh, potentially resolving any issues that may have caused the “Scratch Disk Full” error. Additionally, optimizing performance can help ensure smoother operation and faster editing.
Remember to allocate enough space on your scratch disk for Photoshop to function properly. A scratch disk is a designated area on your hard drive that Photoshop uses for temporary storage when there is not enough RAM available. To change your scratch disk settings:
1. Go to **Edit > Preferences > Performance** (Windows) or **Photoshop > Preferences > Performance** (Mac).
2. Under the “Scratch Disks” section, you will see a list of available drives. Select the drive you want to use as the scratch disk.
3. Use the **up** and **down** arrows to prioritize the order of the scratch disks. Photoshop will use the first available disk with enough space.
4. Click **OK** to save the changes.
Optimizing your scratch disk allocation can help improve overall performance by ensuring that Photoshop has enough space to work with.
Remember to regularly clean up unnecessary files and folders on your computer to free up disk space. This will help prevent the “Scratch Disk Full” error from occurring in the future.
If you still encounter issues or have further questions, consult Adobe’s support resources or reach out to their customer service for additional assistance.
It is advisable to exercise caution when encountering difficulties in placing files because scratch disks might be full, although it is important to not over exaggerate the situation. Download this tool to run a scan