10 Ways to Boost Windows 10 PC Performance
Looking to improve the performance of your Windows 10 PC? Here are 10 ways to boost its speed and efficiency.
Optimize Power Settings for Performance
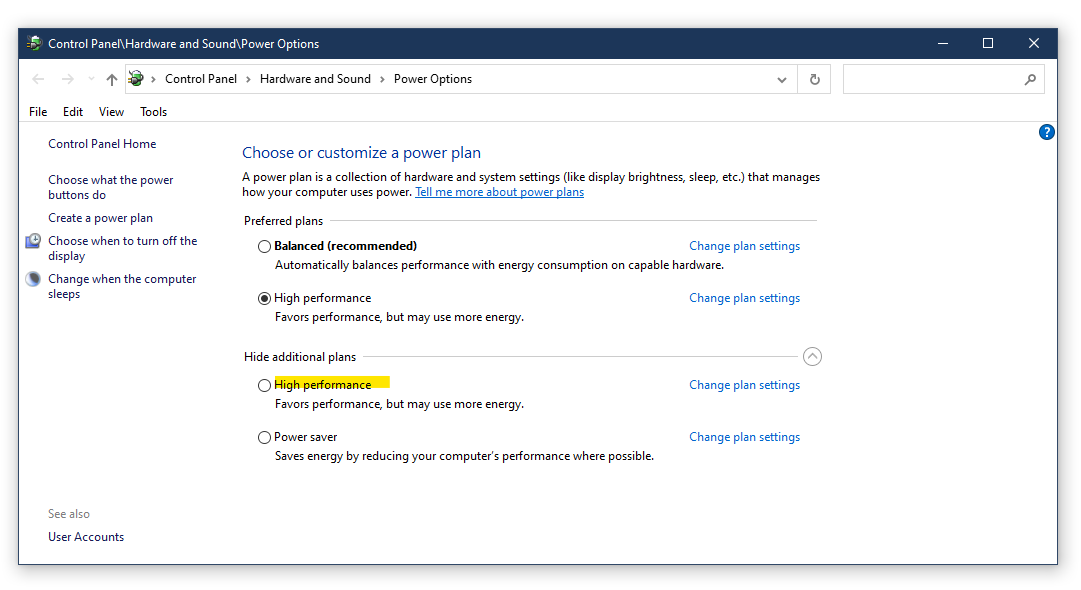
You can also customize the power plan settings by clicking on Change plan settings and then Change advanced power settings. Here, you can adjust settings such as the processor power management, system cooling policy, and display settings to further optimize performance.
In addition, consider adjusting the power settings for individual hardware components like the hard disk drive and wireless adapter. By setting these components to operate at maximum performance, you can boost overall system performance.
Keep in mind that optimizing power settings for performance may result in increased energy consumption and reduced battery life, so it’s best suited for desktop computers or laptops that are plugged in most of the time. If you’re using a laptop on battery power, you may want to switch back to a more balanced power plan to conserve energy.
By optimizing power settings for performance, you can ensure that your Windows 10 PC is running at its best when you need it most.
Disable Startup Programs
- Open Task Manager by pressing Ctrl+Shift+Esc
- Click on the Startup tab at the top of the Task Manager window
- Select the program you want to disable from the list
- Click Disable at the bottom right corner of the Task Manager window
- Repeat for any other programs you want to disable
- Close Task Manager and restart your computer
Restore to a Previous Point
To restore your Windows 10 PC to a previous point, you can use the System Restore feature. This allows you to roll back your system to a time when it was functioning properly. To access System Restore, go to the Control Panel (Windows) and click on “Recovery.” From there, select “Open System Restore” and follow the prompts to choose a restore point.
If you’re experiencing performance issues, it’s a good idea to consider restoring to a point before the problems began. This can help to undo any recent changes that may have impacted your system’s performance. Keep in mind that restoring to a previous point will not affect your personal files, but it may uninstall any recently installed applications or updates.
It’s worth noting that System Restore is not a cure-all for all performance issues, but it can be a helpful tool in troubleshooting and resolving certain problems. If you’re still experiencing issues after restoring to a previous point, you may need to explore other options such as Defragmentation, updating Device drivers, or optimizing your system’s startup programs.
By utilizing the System Restore feature, you can potentially improve the performance of your Windows 10 PC and get it back to a state where it’s running smoothly.
Enhance Disk Caching with ReadyBoost
If you want to enhance your Windows 10 PC performance, consider using ReadyBoost to improve disk caching. ReadyBoost allows you to use a USB flash drive or SD card to supplement your computer’s RAM, which can lead to faster processing and improved overall performance.
To use ReadyBoost, simply insert a compatible USB flash drive or SD card into your computer and follow these steps:
1. Right-click on the drive and select “Properties.”
2. Navigate to the “ReadyBoost” tab.
3. Select “Use this device” and adjust the amount of space you want to dedicate to ReadyBoost.
By utilizing ReadyBoost, you can effectively increase your system’s cache size, which can result in quicker access to frequently used data and applications. This can be especially helpful for older computers or laptops with limited RAM.
In addition to using ReadyBoost, it’s also important to regularly update your Windows 10 PC, optimize your disk through defragmentation, and troubleshoot any device drivers that may be causing performance issues. By taking these steps, you can ensure that your PC is running at its best and experiencing enhanced performance.
Turn Off Windows Tips and Tricks
To do this, go to the Settings menu and select System. From there, click on Notifications & actions and toggle off the option for Show me tips about Windows.
By turning off Windows Tips and Tricks, you can eliminate unnecessary distractions and potentially improve the overall performance of your Windows 10 PC.
Manage OneDrive Sync Settings
Additionally, you can adjust the sync settings by clicking on the “Settings” tab and choosing the “Network” option. Here, you can limit the upload and download speed if you’re experiencing slow performance or want to conserve bandwidth.
It’s also important to keep your OneDrive app up to date by ensuring that Windows Update is running smoothly on your device. Regularly updating your laptop or desktop computer will not only improve performance but also ensure that OneDrive is functioning optimally.
By managing OneDrive sync settings, you can reduce the strain on your PC’s resources and improve overall performance. This is especially important for older devices or those running on Windows 11. By making these adjustments, you can streamline your PC’s operations and enhance its efficiency.
Enable OneDrive Files On-Demand
This will enable OneDrive Files On-Demand, allowing you to access all your files in OneDrive without having to download them and take up space on your hard drive. This can help improve the performance of your Windows 10 PC by reducing the amount of storage space used by your files.
By enabling OneDrive Files On-Demand, you can also free up valuable storage space on your PC, making it easier to manage and organize your files. Additionally, it can help improve the overall performance of your PC by reducing the amount of data that needs to be transferred and processed.
Once you have enabled OneDrive Files On-Demand, you can easily access your files in OneDrive through File Explorer, without having to download them to your PC. This can help streamline your workflow and make it easier to access your files on the go.
Disable Search Indexing
To disable search indexing on your Windows 10 PC, follow these steps. First, open the Control Panel by clicking on the Start button and typing “Control Panel” into the search bar. Then, click on “Indexing Options” and select “Modify”. Next, uncheck the box next to the location you want to disable indexing for.
If you want to disable indexing for the entire PC, uncheck the box next to “Users”. Finally, click “OK” to save your changes. This will help improve the performance of your Windows 10 PC by reducing unnecessary background processes.
It also addresses issues such as damaged DLLs and the Blue Screen of Death, ensuring that Windows and other programs run smoothly. Fortect can even compare the current operating system with a healthy version and restore vital system files for OS recovery.
Perform Disk Cleanup
Once the app is open, select the drive you want to clean up (usually the C: drive) and click “OK.” The app will then calculate how much space you can free up.
Next, check the boxes next to the types of files you want to delete, such as temporary files, recycle bin files, and thumbnails. Then, click “OK” to start the cleanup process.
After the cleanup is complete, you should notice an improvement in your PC’s performance. Additionally, you’ll have more free space on your hard drive for important files and applications.
Clean the Registry
Before making any changes to the Registry, it’s important to back it up. To do this, open the Registry Editor, select “File” and then “Export.” Choose a location to save the backup and give it a name.
Once you have a backup, you can start cleaning the Registry by removing unnecessary or obsolete entries. Be cautious when deleting entries, as it can potentially cause issues with your system if you remove the wrong ones.
To clean the Registry, navigate to the specific keys or entries that you want to remove, right-click on them, and select “Delete.” You can also use the Find function to search for specific entries that you want to clean up.
After making any changes, it’s a good idea to restart your PC to ensure that the changes take effect.
Cleaning the Registry can help improve your Windows 10 PC’s performance by removing outdated or unnecessary entries that may be slowing down your system.
Adjust Visual Effects and Transparency
Reducing or disabling visual effects can help your PC run more efficiently, especially if you have older or slower hardware. Additionally, you can improve performance by adjusting transparency effects. To do this, go to the “Settings” app, then select “Personalization” and click on “Colors.” From here, you can turn off the “Transparency effects” toggle switch to reduce the strain on your system’s resources.
By making these adjustments, you can potentially see a boost in your Windows 10 PC’s performance, allowing for smoother multitasking and faster application loading times.
Keep Device Drivers Updated
To keep your Windows 10 PC running smoothly, it’s important to keep your device drivers updated. Device drivers are essential for the proper functioning of hardware components on your computer, such as your graphics card, network adapter, and sound card.
Outdated device drivers can cause performance issues, so it’s important to regularly check for updates. You can do this by going to the Device Manager in your Control Panel and right-clicking on each hardware component to check for driver updates.
Another option is to use a third-party driver update tool to automatically scan and update all your device drivers. This can save you time and ensure that all your drivers are up to date.
By keeping your device drivers updated, you can improve the stability and performance of your Windows 10 PC. This can also help to prevent compatibility issues with new software or hardware that you may install in the future.
Regularly updating your device drivers is a simple but effective way to boost the performance of your Windows 10 PC. So, make sure to add this to your regular maintenance routine for your personal computer.
Schedule Automated Maintenance
Next, click “Choose maintenance tasks” and select the tasks you want to run automatically, such as software updates, system diagnostics, and disk cleanup. You can also set the time for the maintenance tasks to run by clicking “Change the time of the daily maintenance.”
By scheduling automated maintenance, you can ensure that your Windows 10 PC stays optimized and performs at its best without having to manually run maintenance tasks. This will help keep your system running smoothly and prevent issues that can slow down your computer’s performance.
Remove Bloatware
Another way to remove bloatware is by using the Windows 10 “Fresh Start” feature. This tool allows you to remove all the bloatware and start fresh with a clean installation of Windows 10, keeping your personal files intact.
You can also use a third-party bloatware removal tool that can scan your PC for bloatware and help you remove it quickly and easily. Be sure to research and choose a reputable tool to avoid any potential issues.
Additionally, disabling startup programs that you don’t need can also help improve your PC’s performance. Open Task Manager, go to the Startup tab, and disable any unnecessary programs from starting up when you boot your PC.
Finally, regularly cleaning up your hard drive by removing temporary files, clearing cache, and deleting unused applications can also help remove bloatware and free up space on your PC, ultimately boosting its performance.
Defragment the Hard Disk
To defragment the hard disk on your Windows 10 PC, you can use the built-in tool called Disk Defragmenter. Simply search for it in the Windows search bar and open the program. From there, select the hard drive you want to defragment and click “Optimize. “
Defragmenting the hard disk rearranges the data on the drive, making it easier and faster for the computer to access.
This can help improve the overall performance of your PC, especially if it’s been running slow.
It’s a good idea to defragment your hard disk regularly, especially if you use your PC frequently or have a lot of files and applications. This can help prevent fragmentation from slowing down your system.
After defragmenting your hard disk, you may notice that your Windows 10 PC runs more smoothly and quickly, making your overall computing experience more enjoyable.
Turn Off Game Mode
To turn off Game Mode, go to your Windows Settings and select “Gaming.” Then, click on “Game Mode” and toggle the switch to turn it off. This will prevent Windows from prioritizing gaming performance over other tasks, which can help improve your PC’s overall speed and responsiveness.
By turning off Game Mode, you can ensure that your Windows 10 PC is running at its best for all your tasks, not just gaming. This simple adjustment can make a noticeable difference in your PC’s performance without the need for any additional hardware or software upgrades.
Regularly Restart Windows
Regularly restarting your Windows 10 PC can significantly boost its performance. Restarting your PC clears the system’s memory, closes unnecessary background processes, and refreshes the operating system, which can help improve overall performance.
By restarting your PC regularly, you can ensure that any pending Windows updates are installed, which can address performance issues and improve system stability. This also gives your PC a chance to boot up fresh, clearing out any potential software bloat or temporary files that may be slowing it down.
In addition, restarting your PC can help resolve any troubleshooting issues that may be affecting its performance, such as problematic device drivers or software conflicts. It can also help clear out the cache, which can improve the speed and responsiveness of your web browser and other application software.
Regular restarts can also help prevent system slowdowns caused by memory leaks or other issues that may arise from prolonged use. By making this a regular practice, you can keep your Windows 10 PC running smoothly and efficiently.
Scan for and Remove Malware
If Windows Security doesn’t find any malware, you can also consider using a reputable third-party antivirus software for an additional layer of protection. Make sure to regularly update the antivirus software and run scans to keep your PC clean.
Be cautious when downloading and installing software from the internet, as some programs may come bundled with malware. Stick to trusted sources and always read reviews before downloading anything.
It’s also important to keep your Windows 10 PC up to date with the latest Windows updates. These updates often include security patches that can help protect your PC from malware and other threats.
In addition to scanning for and removing malware, consider implementing other security measures such as using a strong, unique password for your PC and being cautious when clicking on links or downloading attachments in emails and web pages.
By regularly scanning for and removing malware, keeping your PC up to date, and practicing good security habits, you can help boost the performance of your Windows 10 PC and keep it running smoothly.
My computer’s performance has been a bit sluggish since upgrading to Windows 10. Download this tool to run a scan