Internet Explorer Not Opening on Windows 7 – How to Fix
If you’re experiencing issues with Internet Explorer not opening on Windows 7, there are a few potential fixes to try.
Troubleshooting Tips for Windows 7 Users
– Check if Internet Explorer is set as your default browser by going to Control Panel > Programs > Default Programs > Set your default programs, and select Internet Explorer. If it’s not set as default, click Set this program as default.
– Run the Internet Explorer troubleshooter by going to Control Panel > Troubleshooting > View all and selecting Internet Explorer Performance. Follow the on-screen instructions to fix any issues.
– Reset Internet Explorer settings by clicking on the Tools menu, then Internet options, and selecting the Advanced tab. Click Reset and follow the prompts to reset your browser settings.
– Check for Windows updates by going to Control Panel > System and Security > Windows Update. Install any pending updates and restart your computer.
– If the issue persists, try running the System File Checker tool by opening Command Prompt as an administrator and typing sfc /scannow. This will scan and repair any corrupted system files.
– If you have recently installed any new software or updates, try uninstalling them to see if it resolves the issue. Go to Control Panel > Programs > Programs and Features, select the program or update, and click Uninstall.
–
Examine Proxy and DNS Configurations
When Internet Explorer is not opening on Windows 7, it can be due to proxy and DNS configurations. To fix this issue, you can start by checking the proxy settings in Internet Explorer. Open Internet Explorer, go to the Tools menu, and select Internet Options. Then, go to the Connections tab and click on the LAN settings button. Here, make sure that the Use a proxy server for your LAN option is unchecked.
Next, you can reset the DNS settings by opening the Command Prompt as an administrator and typing ipconfig /flushdns to clear the DNS cache. Additionally, you can try changing the DNS server addresses in the network adapter settings to use public DNS servers like Google DNS (8.8.8.8 and 8.8.4.4).
If these steps do not resolve the issue, you may need to run the Network Troubleshooter or consult your network administrator for further assistance. By examining the proxy and DNS configurations, you can troubleshoot and fix the issue of Internet Explorer not opening on Windows 7.
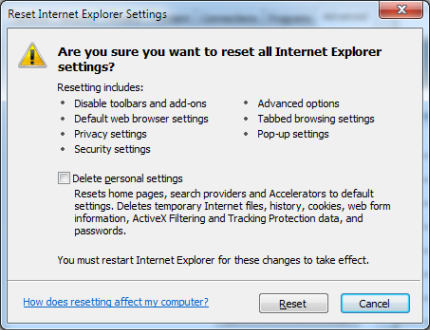
Resetting Internet Explorer Settings
To reset Internet Explorer settings on Windows 7, open the browser and click on the Tools menu icon. Then, select Internet options and go to the Advanced tab. From there, click on the Reset button and follow the prompts to reset the browser settings. This can help resolve issues with Internet Explorer not opening or functioning properly. After resetting the settings, it’s also a good idea to clear the web browsing history and cookies to ensure a clean slate. If the issue persists, consider running a System File Checker scan or checking for Windows updates that may address the problem.
Clearing Browser History
- Open Internet Explorer
- Click on the Tools button (gear icon) in the top-right corner of the browser window
- Select Safety from the drop-down menu
- Click on Delete browsing history
- Check the Browsing history box
- Click Delete to clear the browser history
However, it does not specifically address issues related to Internet Explorer not opening.

Disabling Internet Explorer Add-ons
To disable Internet Explorer add-ons on Windows 7, start by opening Internet Explorer and clicking on the Tools icon in the top-right corner of the window. From the drop-down menu, select Manage add-ons. In the Manage Add-ons window, you can select the add-ons you want to disable and then click on the Disable button at the bottom. This will prevent the add-ons from running when you open Internet Explorer.
If you’re still experiencing issues with Internet Explorer not opening, you can also try resetting the browser settings. To do this, click on the Tools icon, select Internet options, and then go to the Advanced tab. From there, you can click on Reset to restore the browser to its default settings.
Resolving Third-party Software Conflicts
When Internet Explorer is not opening on Windows 7, it could be due to conflicts with third-party software. To fix this issue, start by disabling all add-ons and extensions in Internet Explorer. This can be done by going to the Tools menu, selecting Manage Add-ons, and then disabling all add-ons.
If the issue persists, try resetting Internet Explorer settings to their default state. This can be done by going to the Tools menu, selecting Internet Options, and then clicking on the Advanced tab. From there, you can click on the Reset button to reset all settings.
Another option is to uninstall any recently installed software that may be causing conflicts with Internet Explorer. This can be done by going to the Control Panel, selecting Programs, and then uninstalling any recently installed programs.
If none of these steps resolve the issue, it may be necessary to run a full antivirus scan to check for any malware that could be causing the problem. Additionally, updating Windows and Internet Explorer to the latest versions can also help resolve conflicts with third-party software.
Running System File Checker
To run the System File Checker on Windows 7, follow these steps:
1. Click on the Start menu and type “cmd” into the search bar.
2. Right-click on “Command Prompt” and select “Run as administrator.”
3. In the Command Prompt window, type sfc /scannow and press Enter.
4. The System File Checker will begin scanning your system for any corrupted or missing files.
5. Once the scan is complete, restart your computer and try opening Internet Explorer again.
If the issue persists, you may need to consider other troubleshooting steps or seek further assistance.
Restoring Your System to an Earlier Point
To restore your system to an earlier point, follow these steps:
1. Click on the Start button and type “system restore” in the search box.
2. Select “System Restore” from the list of results.
3. Click on “Next” and then choose a restore point from the list.
4. Follow the on-screen instructions to complete the restoration process.
If Internet Explorer is still not opening after restoring to an earlier point, you may need to consider other troubleshooting steps.
Repairing or Reinstalling Internet Explorer
To repair or reinstall Internet Explorer on Windows 7, you can try resetting the browser settings to default. Go to the Tools menu, select Internet Options, and then click on the Advanced tab. From there, click on Reset and follow the prompts to reset Internet Explorer.
If that doesn’t work, you can reinstall Internet Explorer by going to the Control Panel, selecting Programs and Features, and then clicking on Turn Windows features on or off. Uncheck the box next to Internet Explorer, click OK, and then restart your computer. Once your computer has restarted, go back to the Turn Windows features on or off window and check the box next to Internet Explorer. Restart your computer again to complete the reinstallation.
If you’re still having issues with Internet Explorer not opening, you may want to consider using a different web browser such as Microsoft Edge or Google Chrome as an alternative.
It’s important to be cautious when troubleshooting why Internet Explorer won’t open in Windows 7, as it could be due to a variety of factors that may require simple fixes. Download this tool to run a scan