
Implement Robot Framework using RIDE (Part-2) – User friendly Tech help
In our part-1 we learned how to work with existing test case written as .robot/.txt inside RIDE.
n
nHere we would learn to implement the robot framework functionality in RIDE itself.Further we would move towards best approach in RF.
nDo follow us on Fb,G+,Twitter, it encourages us to learn and share more.
n
Requirement:- Enhance our existing test case using RIDE?
n
nStep1:-
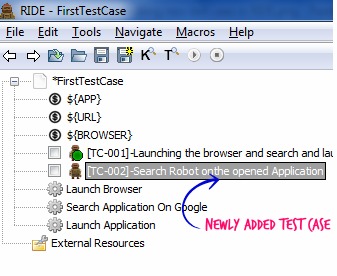
nAdding new Test Case to existing functionality.
n
Right click Test Suite > New Test Case > Name ([TC-002]-Search Robot onthe opened Application).
n n
n
 |
n
Note:- We could have done the same using “Text Edit” tab.
n
Step2:-
n
Adding Test Steps for the newly created test case.
n
Click on the Test case Name (TC-002) and on right side under “Edit” tab, enter the test steps.
n
Test Step 1:- Search The Given Topic On Home Page Of Application
n
Test Step 2:– Click On The First Searched Link
n n
n
Note:- Added Test Steps would be coming in black font, they would turn blue one’s RIDE is able to link them to the corresponding keywords.
n
Step3:-
n
Adding the Keywords for the created steps (Meaning using the Selenium2Library keywords to give meaning to the created test steps).
n
Right click the Test suite > New User Keyword > Name
n
 n
n
Select the newly created keyword -> Under “Edit” tab ->utilize the selenium2Library keywords to perform the operation .
n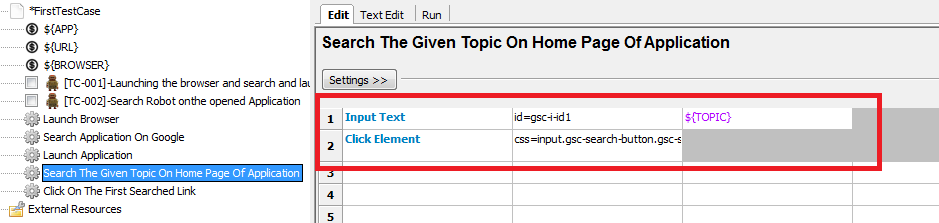 n
n
Note:-
nNow if we click on the “Test Case”([TC-002]) we can see the color change as blue.
n Incase we have already included the “Selenium2Library” in Setting table, we can utilize the intellisense available in RIDE to search for the required keyword from the selenium library.
  n
n
Step4:-
n
Here we would define “$TOPIC” variable used above in the keywords.
n
We can do the same from the explorer window but let’s try from the “Add Scalar” button.
n
Click on Test Suite Name -> on the right side click on “Add Scalar” button > Name/value/Comment
n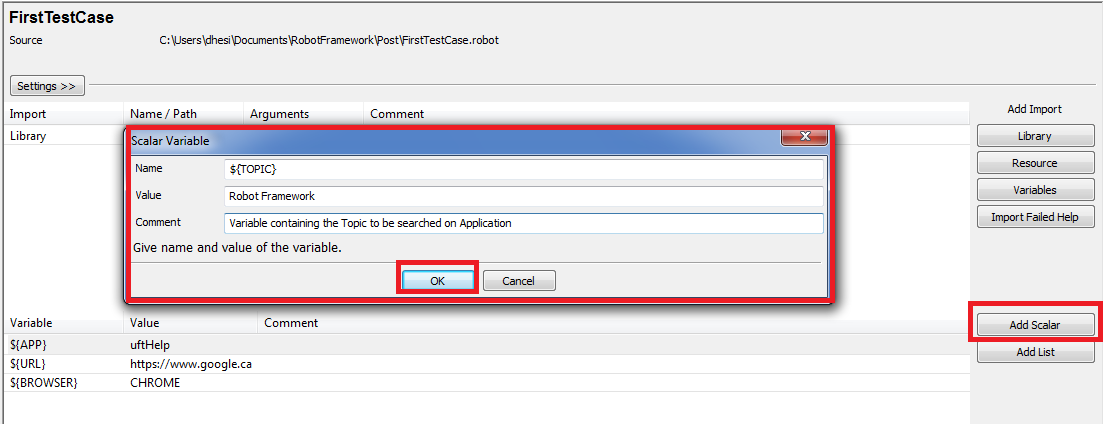 n
n
Step5:-
n
Save and run the test case
n
nCODE:-n
*** Settings ***
Library Selenium2Library
*** Variables ***
${APP} uftHelp
${URL} https://www.google.ca
${BROWSER} CHROME
${TOPIC} Robot Framework # Variable containing the Topic to be searched on Application
*** Test Cases ***
[TC-001]-Launching the browser and search and launch the 'uftHelp' Application on Google.com
 Launch Browser
 Search Application On Google
 Launch Application
[TC-002]-Search Robot onthe opened Application
 Search The Given Topic On Home Page Of Application
 Click On The First Searched Link
*** Keywords ***
Launch Browser
 Open Browser ${URL} ${BROWSER}
 Maximize Browser Window
Search Application On Google
 Input Text id=lst-ib ${APP}
 Click Button name=btnG
Launch Application
 Wait Until Element Is Visible link=User-Friendly Techy-Help 20 Seconds
 Click Element link=User-Friendly Techy-Help
Search The Given Topic On Home Page Of Application
 Input Text id=gsc-i-id1 ${TOPIC}
 Click Element css=input.gsc-search-button.gsc-search-button-v2
Click On The First Searched Link
 Wait Until Element Is Visible xpath=.//*[@id='___gcse_0']/div/div/div[1]/div[6]/div[2]/div[1]/div/div[2]/div[1]/div[1]/div/a 20 s
 Click Element xpath=.//*[@id='___gcse_0']/div/div/div[1]/div[6]/div[2]/div[1]/div/div[2]/div[1]/div[1]/div/a
n
Hope you learned the basics of RIDE and enjoyed our tutorial. Keep learning 🙂
n
n